Kitchen and Bath
How Do I Clean a Greasy Kitchen Ceiling?
If you're like most people, you use your kitchen to prepare food; lot’s of food! From that burnt fish dinner three weeks ago to the sautéed mushrooms you made to top that steak dinner, you are putting bits of soot and oil into the air; much of which will land on your ceiling.
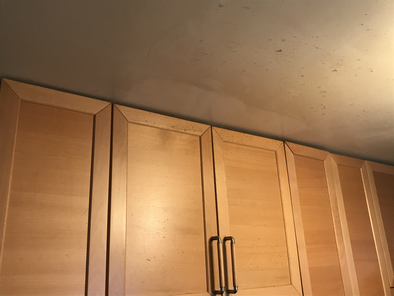
Look up. Does your ceiling have a slight yellow hue that you don’t remember when the paint was fresh? Or does the ceiling over your stove look a tad darker than the rest of the ceiling? Or - worse yet - does your ceiling look “fuzzy?” That fuzz is bits of dust and dirt that got stuck on your ceiling. Hey, no judgement here … it’s not your fault! It’s just part of normal life in an active kitchen.
That being said, let’s clean it up right away!
Supplies:
Step 1: Grab a ladder; bucket; a Magic Eraser, and some all purpose cleaner (Mr. Clean, Fabuloso, Murphy Oil Soap) that mentions grease fighting properties on the label. Or, you can use your favorite dish washing detergent, as detergents are natural grease fighters.
Step 2: Mix your cleaning solution according to the manufacturer's specifications. Use warm water instead of cold water. The warmer the water, the more grease fighting power it has.
Step 3: Wring out a towel that has been dipped in your cleaning solution. The towel should be wet, but not dripping (remember, you are going to be directly below the cleaning area). Start in the corner of the ceiling (your choice .. pick one!). Remember, you are going to work left to right.
Step 4: Clean with the wet towel using overlapping circles. Dip the towel into the bucket, wring and repeat.
Step 5: Dry the area with a clean cloth.
Step 6: Inspect for spots that need a little TLC. Those spots can be recleaned with the solution, or use the Magic Eraser. Eraser sponges come in handy to get the tough areas, especially over the stove.
Step 7: Rinse the area with a different towel dipped in clear water. Use the same overlapping circular motion as when you were cleaning. Dry with a clean towel.
Step 8: Repeat steps 4 through 7 for each section of the ceiling.
Tips:
Look up. Does your ceiling have a slight yellow hue that you don’t remember when the paint was fresh? Or does the ceiling over your stove look a tad darker than the rest of the ceiling? Or - worse yet - does your ceiling look “fuzzy?” That fuzz is bits of dust and dirt that got stuck on your ceiling. Hey, no judgement here … it’s not your fault! It’s just part of normal life in an active kitchen.
That being said, let’s clean it up right away!
Supplies:
- Magic Eraser (or similar cleaning item)
- Clean towels / rags (micro fiber are best, but terry cloth will work fine, too) NOTE: Paper towels are your last choice for this project, as the paper towel will likely shred as it encounters the sticky, greasy residue on the ceiling.
- Bucket
- Grease fighting cleaner (Mr. Clean, Fabulosa, etc.)
- Goggles (Anytime you are working with a cleaner over your head, you should wear goggles. This is coming from a person who was rushed to the emergency room to have his eyes flushed while cleaning a customer’s bathroom).
Step 1: Grab a ladder; bucket; a Magic Eraser, and some all purpose cleaner (Mr. Clean, Fabuloso, Murphy Oil Soap) that mentions grease fighting properties on the label. Or, you can use your favorite dish washing detergent, as detergents are natural grease fighters.
Step 2: Mix your cleaning solution according to the manufacturer's specifications. Use warm water instead of cold water. The warmer the water, the more grease fighting power it has.
Step 3: Wring out a towel that has been dipped in your cleaning solution. The towel should be wet, but not dripping (remember, you are going to be directly below the cleaning area). Start in the corner of the ceiling (your choice .. pick one!). Remember, you are going to work left to right.
Step 4: Clean with the wet towel using overlapping circles. Dip the towel into the bucket, wring and repeat.
Step 5: Dry the area with a clean cloth.
Step 6: Inspect for spots that need a little TLC. Those spots can be recleaned with the solution, or use the Magic Eraser. Eraser sponges come in handy to get the tough areas, especially over the stove.
Step 7: Rinse the area with a different towel dipped in clear water. Use the same overlapping circular motion as when you were cleaning. Dry with a clean towel.
Step 8: Repeat steps 4 through 7 for each section of the ceiling.
Tips:
- Take breaks. Working with your hands over your head is tiring work. Work gets sloppy and results drop when you rush to “get the job done.” Even if you have to do half the job today and the other half tomorrow, you will thank yourself when you see a well cleaned ceiling.
- Do not place your bucket behind your ladder. Speaking from experience, it is easy to wring out your cloth and leave the bucket behind the ladder. Why is this a problem? It is a trip hazard for when you step off the ladder (not to mention the mess if you knock over the bucket!).
- The final rinse and dry is an important step. That extra minute to rinse and dry is what eliminates streaks and dirt lines on the ceiling. Do not underestimate the importance of drying.